
Step 1 - Theme Options
To begin customizing your site go to Appearance -> Customizer and select Theme Options. Here's you'll find custom options to help build your site.

To begin customizing your site go to Appearance -> Customizer and select Theme Options. Here's you'll find custom options to help build your site.

To add a slider go to Theme Options -> Homepage and choose page slider. The slider will use the page title, excerpt and featured image for the slides.

To add featured content go to Theme Options -> Homepage (Featured) and turn the switch on then add the content you want for each section.

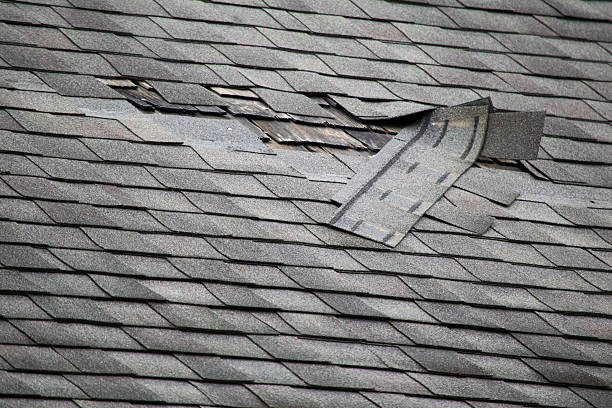
Replacing a roof is a significant task that requires planning, the right tools, and careful execution. While some homeowners may choose to handle small-scale repairs, replacing an entire roof is typically more complex. Below is a step-by-step guide for homeowners considering this project.
If these issues are widespread, it’s likely time for a full roof replacement rather than minor repairs.
Tools:
– Ladder with stabilizers
– Nail gun or roofing hammer
– Pry bars for removing old shingles
– Utility knife for cutting materials
Materials:
| Material Type | Purpose | |—————|———————————-| | Roofing Shingles/Material | Surface covering providing protection | | Underlayment | Moisture barrier beneath shingles | | Roofing Nails | Secures shingles in place | | Flashing | Prevents water seepage around edges |
Having these on hand will prevent unnecessary delays during the replacement process.
Start by removing existing shingles carefully using pry bars or shingle removers. Clear away old underlayment, nails, and debris to ensure the decking underneath is clean and smooth.
Conducting a thorough inspection reduces potential risks later on.
Replacing a roof can be rewarding if done correctly but requires patience, skill, and attention to detail throughout every step outlined above.
Roofing is one of the most critical components of your home’s structure, protecting you and your family from the elements while contributing to energy efficiency and aesthetic appeal. When it comes to ensuring your roof’s longevity and proper functioning, enlisting the help of professional roofers is often the best decision. With their expertise, advanced tools, and industry knowledge, professional roofers can provide tailored solutions for any roofing challenge.
| Service Type | Description |
| Roof Inspections | Assessing the condition of your roof to detect leaks, damage, or wear. |
| Roof Repairs | Fixing specific issues such as damaged shingles or leaks. |
| Full Roof Installation | Installing new roofs for homes under construction or replacing old ones. |
| Maintenance Plans | Regular upkeep services like cleaning debris or replacing aging components. |
| Emergency Repairs | Immediate solutions for storm damage or other urgent roofing issues. |
Working with skilled professionals not only saves time but also provides peace of mind knowing your home’s most vital structure is in capable hands.
Hiring expert roofers is an investment in both safety and long-term value for your home—an investment well worth making when it comes to something as important as your roof’s integrity.
When it comes to maintaining, repairing, or replacing a roof, turning to professional roofers can make all the difference. Expert roofing solutions not only ensure quality and longevity but also provide homeowners with peace of mind knowing that their project is in capable hands. Below, we explore the key reasons why hiring a professional roofer is a smart investment and what services they typically offer.
| Service Type | Description |
| Roof Inspections | Assessing the condition of your roof for damages, leaks, weathering effects, or weak spots |
| Repairs | Fixing damaged shingles, leaks, flashing problems, poor ventilation systems |
| New Roof Installations | Complete tear-off or overlay installations for new roofs |
| Roof Maintenance Plans | Regular cleaning and upkeep services to prolong the lifespan of your roof |
| Emergency Repairs | Rapid response service for urgent needs caused by storms or other disasters |
By working with trusted professionals who prioritize quality craftsmanship and safety standards, homeowners can enjoy durable roofs that protect their homes effectively over time.
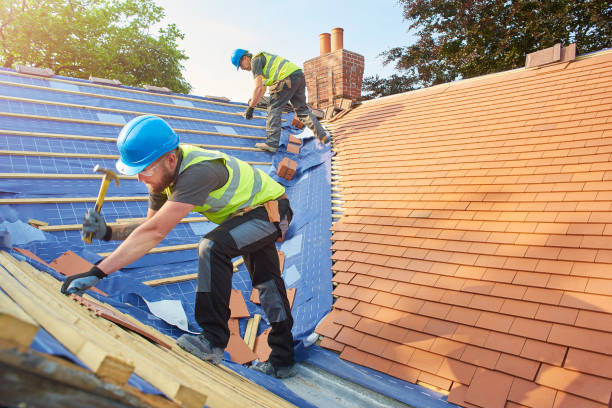
Roofing installation may seem like a task that can be tackled with enthusiasm and a little research, but it’s far more complex than many homeowners realize. While some home improvement projects are well-suited for DIY approaches, roofing is an area where hiring professional roofers is not just recommended—it’s essential. Below, we explore the reasons why this task should be entrusted to experienced professionals.
Each material has unique installation requirements, which professionals understand thoroughly. Their expertise ensures proper techniques are used to provide a durable and watertight roof.
Professional roofers follow strict safety protocols, reducing risks for both themselves and the homeowner.
| Potential Issue | Estimated Cost Range |
| Incorrect installation | $2,000 – $5,000 |
| Water damage repairs | $1,500 – $8,000 |
| Roof replacement (premature) | $5,000 – $20,000+ |
Hiring professionals ensures the job is done right from the beginning—saving you from costly repairs or premature replacements later on.
Many manufacturers require certified professional installation for their warranties to remain valid. Opting for DIY methods can void these warranties entirely. If an issue arises later—such as leaks or material defects—a valid warranty can cover repair or replacement costs. Professional roofers ensure proper documentation and compliance with warranty guidelines.
Replacing or installing a roof can take weeks or even months for non-professionals trying to tackle it part-time. In contrast, a professional roofer typically completes projects within days due to their expertise and access to commercial-grade equipment.
By entrusting professionals with your roofing project: – You save time by avoiding trial-and-error approaches. – Your home remains protected against weather-related issues during construction. – You avoid disruptions caused by delays common in amateur jobs.
Professional roofers have connections with suppliers that allow them access to high-quality materials at competitive prices—materials that may not be available at your local hardware store. This ensures: 1. Better durability. 2. Enhanced aesthetics. 3. Increased roof lifespan.
Additionally, professionals are knowledgeable about eco-friendly options like cool roofs or solar panel integration if you’re looking for sustainable solutions.
One of the greatest benefits of hiring professionals is peace of mind knowing your home is safeguarded by skillful craftsmanship that meets industry standards. A professionally installed roof also boosts curb appeal and property value when it comes time to sell your home.
When it comes to roofing installation, many homeowners might be tempted to take on the job themselves in an effort to save money. However, roofing is a highly skilled and technical process that requires expertise, precision, and specialized tools. Here’s why hiring professional roofers is the smarter and safer choice for your home.
Roofing installation involves more than just laying shingles or tiles. It requires detailed planning, expert knowledge of materials, and an understanding of building codes. Professionals are trained to:
– Assess the structure of your roof to ensure it can support the selected roofing material.
– Install proper underlayment systems to prevent water infiltration and leaks.
– Account for ventilation needs that help regulate attic temperature and extend roof lifespan.
– Precisely measure and cut materials to avoid gaps or overlaps that could lead to future damage.
These steps demand accuracy that only comes with experience, making it challenging for a DIY approach to achieve comparable results.
Roofing work often takes place at significant heights, increasing the risk of accidents such as falls or injuries from handling heavy tools and materials. Professional roofers are trained in safety protocols and use appropriate equipment like harnesses, scaffolding, and ladders designed specifically for roofing projects. By entrusting professionals with this task, you minimize safety risks for yourself and others involved in your project.
While DIY roofing might seem cost-effective initially, it can lead to costly mistakes if not done correctly. Common issues with amateur installations include:
– Improper sealing leading to leaks.
– Poor alignment causing uneven wear on shingles or tiles.
– Using subpar materials that require frequent repairs or replacements.
Professional roofers not only bring expertise but also have access to high-quality materials at better rates due to industry connections. Additionally, many reputable companies offer warranties on both labor and materials, providing peace of mind long after the project is complete.
| DIY Roof Installation | Professional Roofing Services |
| High risk of errors | Expert knowledge ensures accuracy |
| Limited access to quality tools | Uses specialized equipment |
| No labor warranty | Warranties included |
Roofing projects must comply with local building codes regarding structure integrity, fire resistance, insulation standards, etc., which are essential for safety and legality reasons. Professional contractors are well-versed in these regulations and will ensure your new roof meets all required standards while avoiding potential fines or legal complications.
Hiring professionals also means benefiting from their years of experience in solving complex challenges such as:
– Repairing hidden structural damage discovered during installation. – Selecting the best materials suited for your climate. – Managing time efficiently so your project stays on schedule.
Additionally, professional companies often provide post-installation cleanup services—leaving your property free from construction debris—something DIY installers may overlook.
Opting for professional roofing services ensures durability, adherence to regulations, cost savings over time, enhanced safety measures during installation—all while adding tangible value through expert craftsmanship provided by skilled individuals who specialize in their trade.
Replacing a roof is a significant investment and a critical project for maintaining the structural integrity and value of your home. A well-organized, step-by-step approach ensures the process is efficient, effective, and results in a durable roof that lasts for years. Below is a comprehensive 11-step guide to help homeowners navigate roof replacement from start to finish.
Before starting, assess the condition of your current roof. Look for signs such as leaks, missing shingles, sagging areas, or mold growth. This inspection helps determine whether repair or full replacement is needed.
Signs Your Roof Needs Replacement:
– Shingles are curling or cracking
– Roof age exceeds 20 years (for asphalt shingles)
– Persistent leaks despite repairs
– Granule loss on shingles
Selecting the right roofing material impacts durability, aesthetics, and maintenance needs. Consider factors like climate, budget, and architectural style when making your choice.
Popular Roofing Material Options:| Material | Durability (Years) | Cost Range (per sq. ft.
Decide whether you want to work with licensed contractors or attempt a DIY approach if you are experienced with roofing projects. Keep in mind that professional installers provide warranties and expertise.
Check local building regulations to determine if permits are required for roof replacement in your area. Failure to comply with code requirements can lead to fines or complications during resale.
Stripping off existing shingles is crucial to ensure proper installation of new materials. Use tools like roofing shovels or scrapers for this task.
Tip:Protect landscaping around your home by covering plants with tarps before starting removal.
Examine the underlying decking after removing old materials for signs of rot or damage. Replace compromised sections to provide a sturdy base for new shingles.
Lay down roofing underlayment to create an additional layer of water resistance beneath your shingles. Choose options such as synthetic underlayment or felt paper based on budget and climate.
Benefits of Underlayment:
– Prevents moisture infiltration
– Adds insulation value
– Enhances overall performance of roofing materials
Install flashing around chimneys, skylights, valleys, and other areas prone to water seepage to improve waterproofing.
Begin installing shingles (or another material) at the lower edge of your roof, working upward in overlapping layers according to manufacturer guidelines.
Key Tips During Installation:
– Align shingle rows evenly for aesthetic consistency
– Use nails designed specifically for roofing applications
– Avoid overdriving nails into the material
Adequate attic ventilation prevents issues like excessive heat buildup or moisture accumulation that can compromise both comfort and structural integrity.
Common Ventilation Components: – Ridge vents
– Soffit vents
Carefully examine all completed work before considering it finished using a checklist that includes verifying flashing placement, ensuring even shingle rows, and checking overall cleanliness at the job site.
Having these steps clearly outlined provides homeowners with clarity throughout what might otherwise feel like an overwhelming project while helping ensure long-term durability from their investment into new roofing systems.
Replacing a roof is a significant project that requires proper planning, the right tools, and careful execution. This step-by-step guide provides homeowners with a clear roadmap to ensure the replacement process is efficient and results in a durable, long-lasting roof.
Before starting, assess the condition of your existing roof. Determine if you need a full replacement or partial repairs.
– Age of the roof
– Extent of damage (e. g.
– Type of roofing material currently installed
Create a timeline for your project and set a realistic budget based on material costs and labor requirements.
Check with your local building authority to confirm whether permits are required for your roofing project. Ensuring compliance with regulations helps avoid fines or complications later on.
Start by stripping away old shingles or tiles using tools like roofing shovels or pry bars. Collect debris in a dumpster or tarp to keep your workspace clean and safe.
Key tips:
– Wear safety equipment such as gloves, goggles, and sturdy boots.
– Inspect the underlayment for water damage during this stage.
Once the old roofing material is removed, closely examine the roof deck for issues like rot or structural weakness. – Replace damaged plywood panels. – Sand rough areas to create an even surface for new materials.
If necessary, install additional support beams to strengthen weak areas of the decking.
A drip edge prevents water from seeping under shingles at roof edges: 1. Nail drip edge along eaves, ensuring it runs flush with fascia boards. 2. Install another layer along gable ends after adding underlayment.
Underlayment acts as an additional moisture barrier beneath shingles: 1. Roll out waterproof membrane starting from eaves toward ridges. 2. Overlap sections by at least 6 inches to prevent gaps. 3. Secure underlayment with roofing nails spaced about every 12 inches.
For extra protection in areas prone to ice dams or heavy rainfall:
– Use self-adhering ice-and-water shield around valleys and penetrations like chimneys.
Proper shingle installation ensures durability:
– Begin at bottom edges using starter shingles designed with adhesive strips for wind resistance. – Lay regular shingles row by row; stagger seams between rows to minimize leaks. – Nail each shingle securely per manufacturer recommendations (usually four nails per standard-sized shingle).
For metal roofs: | Step | Description | |——|————-| | Cut Panels | Trim metal panels according to dimensions specified in your plan | | Secure Panels | Fasten panels using screws equipped w/ rubber washers |
Replacing a roof is a significant undertaking that requires careful planning, precision, and proper execution. Below is a step-by-step process to help homeowners and roofing professionals ensure the roof replacement is carried out effectively and efficiently. Following these steps can help prolong the life of your new roof while avoiding costly mistakes.
Before beginning any work, inspect the current condition of your roof to determine whether repairs or a full replacement are necessary.
– Broken or missing shingles
– Sagging areas on the roof deck
– Leaks or water damage inside your home
– Cracked flashing or improperly sealed vents
If you’re unsure about what to look for, consider hiring a roofing professional for an initial assessment.
Proper permits are often required for roof replacements, depending on local building codes. Be sure to check with your local authorities before starting the project.
– Roofing shingles (asphalt, metal, or other types)
– Underlayment (felt paper or synthetic options)
– Roofing nails and staples
– Flashing materials (aluminum or galvanized steel)
Having all necessary tools like hammers, utility knives, and roofing nailers ready in advance is equally important.
Safely remove the existing shingles and underlayment from your roof. Use tools like shingle scrapers or pry bars to make this process efficient.
– Work section by section to avoid overloading your roof structure with debris.
– Dispose of old materials responsibly by renting a dumpster or recycling whenever possible.
Ensure the entire surface is clean before moving forward.
With all old materials removed, inspect the roof deck thoroughly for rot or damage.
1. Replacing damaged plywood sheathing with new panels if necessary. 2. Tightening loose nails that might compromise structural integrity. 3. Sanding rough areas on wood surfaces to create an even finish.
A sound deck will provide a sturdy foundation for underlayment and shingles.
Install an underlayment layer over the entire surface of your prepared deck for waterproofing purposes.
Begin installation at one edge of the roof while overlapping each row by about 6 inches to prevent water infiltration.
Starter shingles form a protective barrier at eaves and rakes against wind-driven rain: 1. Cut regular shingles into halves if starter strips are unavailable. 2. Align starter pieces along eaves using chalk lines as guides. 3. Nail them securely into place without leaving gaps.
Starter strips ensure proper alignment when laying subsequent rows of shingles.
Lay main rows starting from bottom edges toward peak points of slopes: * Use staggered patterns following manufacturer guidelines. * Overlap adjacent pieces slightly based on specific product recommendations. * Secure every shingle using recommended fasteners spaced evenly across widths.
Taking time during placement ensures visual appeal alongside performance benefits long-term.
Install flashing around chimneys, skylights, valleys & vent pipes: * Use rust-resistant metals sealed tightly around protrusion bases. * Double-check compatibility between flashing dimensions versus gap sizes needing coverage.
Properly installed flashing prevents leaks where shingles alone cannot suffice adequately against water intrusion risks unique per area layout specifics faced regionally globally alike overall alike contexts too globally more
Thoroughly inspecting and repairing your roof deck before installing new shingles is a crucial step in ensuring the longevity and effectiveness of your roofing system. The roof deck acts as the foundational layer that supports shingles, so it must be structurally sound and free from damage. Below is a detailed guide on how to inspect and repair your roof deck properly.
To conduct a proper inspection, gather these essential tools: – Hammer or screwdriver (to test wood integrity) – Flashlight (to check for rot in dark areas) – Measuring tape (for assessing damaged sections) – Pry bar (to remove old materials) – Replacement plywood or sheathing for repairs – Roofing nails or screws – Construction adhesive
Taking time to carefully inspect and repair your roof deck ensures that your new shingles have a strong base. This preventative measure not only improves durability but also helps you avoid unnecessary expenses related to structural damage later on. A well-maintained roof deck contributes significantly to an effective roofing system built to withstand various environmental challenges.
Proper installation of flashing and ventilation components is critical for ensuring your roof withstands the test of time. These elements play a pivotal role in preventing water damage, improving energy efficiency, and extending the lifespan of your roofing system. Below, we explore how these components work and provide step-by-step guidance for their installation.
Flashing consists of thin sheets of metal or other waterproof materials installed around vulnerable areas on your roof where water infiltration is likely.
Flashing acts as a barrier to direct water away from these critical points, reducing the likelihood of leaks or structural damage.
| Type | Application Area | Material Used |
| Step Flashing | Along walls that meet the roof | Aluminum or Galvanized Steel |
| Drip Edge Flashing | Edges of the roof | Aluminum |
| Valley Flashing | Roof valleys | Pre-formed Metal Sheets |
| Chimney Flashing | Around chimneys | Copper or Lead |
Selecting the right type ensures optimal protection for each vulnerable area.
Proper ventilation regulates airflow in your attic space, preventing moisture buildup and maintaining a balanced temperature.

A combination of intake vents (e. g. , soffit vents) and exhaust vents (e. g. , ridge vents) creates an effective airflow system.
Appropriate installation techniques for flashing and ventilation not only enhance durability but also minimize costly repairs down the line by protecting against common issues like leaks and energy inefficiency during seasonal changes.
Proper installation of flashing and ventilation components is an essential aspect of any roofing project. These elements play a key role in protecting your home from water damage, reducing energy costs, and prolonging the lifespan of your roof. Below is a comprehensive guide to help you understand the importance of these components and how to install them correctly.
Flashing is a thin material, typically made of galvanized steel or aluminum, designed to direct water away from critical areas on your roof where leaks commonly occur.
Without proper flashing, moisture can seep into the underlying structure, leading to mold growth, rot, and structural damage.
Types of Flashing Materials:
| Material | Pros | Cons |
|——————–|———————————————|———————————|
| Aluminum | Lightweight, rust-resistant | Can corrode when in contact with concrete or mortar |
| Galvanized Steel | Durable and cost-effective | May rust over time |
| Copper | Long-lasting and aesthetically pleasing | Expensive |
Properly installed flashing serves as a frontline defense against leaks while improving overall roof durability.
Ventilation ensures that air circulates properly through your attic space, preventing moisture buildup, regulating temperature extremes, and extending the lifespan of roofing materials.
Both flashing and ventilation are critical components that work together to enhance your roof’s functionality while protecting it from weather-related wear-and-tear over time.
Proper installation of flashing and ventilation components is essential for ensuring a durable and long-lasting roof. These elements play a critical role in protecting your home from water damage, regulating temperature, and maintaining the structural integrity of your roofing system. Below is a detailed overview of their importance, the types available, and key steps to install them effectively.
Flashing is used to prevent water from seeping into vulnerable areas of your roof, such as valleys, chimneys, vents, and skylights. Without proper flashing, these areas can become susceptible to leaks and water damage.
Common Types of Flashing:
– Step flashing: Installed along wall-roof intersections or where dormers meet the roof.
– Drip edge flashing: Protects the edges of your roof by directing water away from the fascia and into gutters.
– Valley flashing: Used in roof valleys where two different slopes meet.
– Chimney flashing: Specifically designed to seal around chimney bases.
A well-ventilated roof ensures proper airflow in the attic space, which helps regulate temperature and moisture levels. Poor ventilation can lead to problems such as mold growth, structural weakening due to trapped humidity, or even premature shingle deterioration.
Types of Roof Ventilation Systems:
1.Ridge vents– Installed at the peak of a sloped roof to allow warm air to escape.
2.Soffit vents
3.Gable vents– Positioned on gable ends for cross ventilation within attic spaces.
Proper balance between intake (soffit) and exhaust (ridge or gable) vents is crucial for effective performance.
| Component | Purpose | Key Installation Tip |
| Step Flashing | Prevents leaks near walls/dormers | Overlap pieces by at least 2 inches |
| Ridge Vent | Releases warm air | Install along ridge line evenly |
| Soffit Vent | Draws in cool air | Keep free from insulation blockage |
Properly installing both flashing and ventilation components not only extends your roof’s lifespan but also prevents costly repairs down the line caused by water penetration or inadequate airflow management systems.

Replacing your roof can seem like a daunting task, but with the right approach and preparation, it is manageable for a skilled homeowner. Below is an 11-step guide to help you navigate this process effectively while ensuring safety and durability.
Begin by inspecting your roof for common signs of damage:
– Missing or damaged shingles
– Water stains on ceilings or attic walls
– Leaking or sagging areas
If your roof is over 20 years old or exhibits significant wear, replacement may be necessary.
Check with local authorities regarding building codes and permits. Many regions require homeowners to acquire permits before beginning major roofing projects.
Select a material suitable for your home’s style, budget, and climate. Common options include:
| Material Type | Durability | Cost (per sq ft) | Maintenance | Sustainability | |——————-|—————–|——————|—————-|—————-| | Asphalt Shingles | 15-30 years | Low | Moderate | Medium | | Metal | 40-70 years | Moderate | Low | High | | Tile | Up to 100 years | High | Low | High |
Ensure you have everything needed before starting:
Tools: Ladder, roofing nails, nail gun, pry bar, utility knife, chalk line, safety harness.
Materials: Underlayment, shingles (or chosen material), flashing, sealant.
Working on a roof poses risks. Follow these guidelines:
– Use a sturdy ladder secured at ground level. – Wear non-slip footwear. – Utilize a harness connected to an anchor point. – Avoid working alone or in adverse weather conditions.
Carefully strip away all existing shingles or materials using a pry bar and shovel. Be sure to dispose of debris responsibly by renting a dumpster or contacting local waste management services.
Examine the decking for rot or damage before proceeding further:
Replace any compromised sections with new plywood to ensure structural integrity.
Lay down underlayment across the entire roof surface as protection against moisture infiltration: 1. Begin at the eaves and work upward in overlapping rows. 2. For colder climates prone to ice dams, install an ice-and-water shield beneath the underlayment near edges.
Install metal flashing around chimneys, skylights, vents, and valleys: This step prevents water seepage into vulnerable areas and extends your roof’s lifespan.
Start applying shingles (or your chosen material) from the bottom edge upward while following manufacturer instructions: – Properly align each layer using chalk lines. – Secure every piece firmly with nails spaced according to guidelines. For alternatives like metal roofs or tiles, cutting pieces precisely is key during installation.
Once installation is complete: 1. Walk around your property looking for misplaced nails or remaining debris. 2. Ensure all flashing is tightly sealed. 3. Double-check alignment of roofing materials for uniformity.
Replacing your roof yourself requires patience and attention to detail but can be both cost-effective and rewarding when executed properly.
Replacing a roof is a significant undertaking that requires both careful planning and the right set of tools and materials. Ensuring you have all the essentials before starting the project can save time, reduce stress, and improve the overall quality of your work. Below, we’ve outlined the key materials and tools necessary for a smooth roof replacement process.
| Tool/Material | Purpose | Mandatory/Optional |
| Roofing Shingles | Provides weatherproof covering | Mandatory |
| Underlayment | Adds an extra layer of protection | Mandatory |
| Pry Bar | Removes old roofing material | Mandatory |
| Nail Gun | Speeds up nail installation | Optional |
| Ice & Water Shield | Prevents leaks in vulnerable areas | Mandatory |
By gathering all essential materials and tools ahead of time, you’ll set yourself up for success when replacing your roof as a handy homeowner. Remember that preparation is key to achieving professional-level results!
Replacing your roof can be a daunting task, but with the right process and preparation, it can be efficiently managed even by a handy homeowner. By breaking the project into clear, manageable steps, you’ll ensure your roof replacement is completed safely and effectively.
Before you begin replacing your roof, conduct a thorough inspection to evaluate its current condition. Look for:
– Missing, curling, or cracked shingles
– Signs of leaks or water damage in the attic or ceilings
– Sagging areas that could indicate structural issues
– The presence of mold, algae, or moss growth
Document damaged areas with photos to help guide the replacement process.
Check local building codes to determine if permits are required for roof replacement in your area. Having all necessary paperwork ensures you’re complying with laws and avoiding potential penalties.
Materials:
– Roofing shingles (asphalt or chosen alternative)
– Underlayment (felt paper or synthetic options)
– Drip edge material
– Flashing components (metal pieces for valleys, chimneys, etc.)
Tools:
– Pry bar or roofing shovel for removing old shingles
– Roofing nail gun and nails
– Tape measure and utility knife for precision cuts
– Safety equipment such as gloves, harnesses, and goggles
Carefully strip away existing shingles using a pry bar or roofing shovel. Be sure to work section by section to maintain control over debris removal. Dispose of old materials responsibly by renting a dumpster or arranging proper waste management services.
Once the old materials are removed, examine the roof decking for signs of rot or weak spots. Replace any damaged plywood sheathing before proceeding further. Use this step to ensure a solid foundation for new roofing materials.
Install drip edge flashing along the eaves to protect against water infiltration beneath your underlayment.
Roll out waterproof underlayment across your decking surface. Secure it with staples or roofing nails as per manufacturer instructions. Proper underlayment acts as an additional barrier against moisture penetration.
Place flashing around chimneys, vents, valleys, and other vulnerable points where water might seep through seams in shingles.
| Flashing Area | Recommended Material | Purpose |
| Chimneys | Aluminum/Copper | Prevent water from pooling at base |
| Valleys | Galvanized Steel | Diverts water flow effectively |
| Skylights | Rubber/Metal | Ensures watertight seal |
Follow manufacturer guidelines to install shingles row by row. Start from the bottom edge of your roofline and move upward while overlapping each layer adequately—this overlap prevents water from seeping between gaps during rainfall.
Pro Tip: Use chalk lines across your decking surface as guides to maintain consistent alignment during installation.
Cap off adjacent sides at ridges using ridge cap shingles designed specifically for this purpose—they provide both aesthetic appeal and enhanced protection against high winds.
After completing installation: 1. Check shingle alignment one final time. 2. Ensure nails are securely driven without overpenetrating. 3. Confirm flashing is sealed tightly around all joints. 4. Clear gutters of debris caused during construction work.
By following these steps systematically, you’ll achieve professional-quality results while extending the lifespan of your home’s most critical defense—the roof itself.
Proper inspection and repair of your roof deck are critical steps in the roof replacement process. Ignoring these steps can lead to structural issues, leaks, and costly future repairs. Whether you’re a DIY enthusiast or a homeowner who wants to oversee the process thoroughly, understanding how to assess and mend your roof deck is essential.
The roof deck serves as the foundation for your roofing system. It supports shingles, underlayment, and other components, ensuring they perform effectively. Over time, exposure to moisture, pests, or structural wear can weaken this layer. Failing to address damage before installing a new roof could shorten its lifespan and compromise safety.
Some key risks of ignoring roof deck repair: – Water Damage: Hidden leaks can rot wood over time. – Mold Growth: Damaged areas might foster mold that spreads through the structure. – Structural Weakness: A compromised deck may reduce the overall load-bearing capacity of your roof.
Before starting the inspection process, gather these essential tools: – Flashlight (for spotting hidden damage) – Pry bar (to lift shingles if necessary) – Hammer or crowbar (for removing nails) – Measuring tape – Marker or chalk (to highlight areas of concern) – Safety gear: gloves, sturdy boots with grip soles, and protective eyewear
Using appropriate safety precautions while working at heights is crucial.
Small Cracks or Holes: – Use wood filler designed for outdoor applications. – Sand down patched areas once dry to ensure smoothness.
Rotten Sections: 1. Cut out damaged pieces using a saw. 2. Replace them with new plywood panels of similar thickness. 3. Secure fresh panels using galvanized nails spaced every 6 inches along edges and 12 inches within interior sections.
Sagging Areas: – Reinforce weak spots by installing additional supports underneath beams where necessary.
To ensure long-term durability after replacing your roof: 1. Install proper ventilation systems — reducing moisture buildup extends decking life. 2. Use high-quality underlayment designed to provide an additional barrier against water intrusion. 3. Schedule periodic professional inspections even after completing replacement work.
By paying close attention during this phase of roof replacement, you safeguard both your investment and home structure from potential hazards down the road.
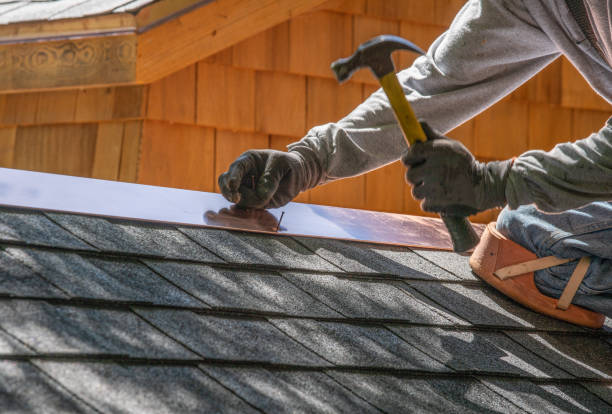
Properly installing roofing shingles is a critical step in ensuring your roof’s durability, functionality, and aesthetic appeal. Whether you’re opting for traditional asphalt shingles or exploring alternative materials like metal, slate, or wood, understanding the installation process and its nuances is essential for a successful outcome.
| Shingle Type | Benefits | Considerations |
| Asphalt Shingles | Affordable, versatile, easy to install | Moderate lifespan (15-30 years), can fade over time |
| Metal Shingles | Durable, eco-friendly, fire-resistant | Higher upfront cost |
| Slate Shingles | Long-lasting (50+ years), natural appearance | Heavier material requiring strong roof structure |
| Wood Shingles/Shakes | Natural look, good insulation properties | Prone to rot in wet climates; needs maintenance |
| Composite Shingles | Lightweight, customizable designs | Slightly more expensive than asphalt |
Installing roofing shingles requires careful attention to detail but offers an opportunity for homeowners or contractors to enhance both function and appearance on any property effectively. With proper preparation and execution tailored to your chosen material type, you can achieve lasting results that protect your home efficiently while looking great year after year.
When undertaking a roof replacement project, many homeowners focus on selecting the right roofing materials or ensuring proper installation techniques. However, two critical components—ventilation and flashing—are often overlooked, despite their significant impact on the longevity and performance of your roof. Proper ventilation and flashing not only protect your home from moisture damage but also contribute to energy efficiency and comfort.
Roof ventilation involves creating a balanced airflow between intake vents (located at the eaves or soffits) and exhaust vents (typically installed near the ridge). This system helps regulate temperature and moisture levels within your attic space.
| Type of Vent | Description |
| Intake Vents | Allow cool air to enter into attic spaces through eaves or soffits. |
| Exhaust Vents | Release warm air from the attic through ridges or gable ends. |
To ensure proper ventilation during a roof replacement, consult local building codes for minimum requirements or work with a professional roofer who can calculate your home’s specific needs.
Flashing consists of thin pieces of metal (e.g., aluminum or galvanized steel) used to direct water away from vulnerable areas of your roof. It is commonly installed around chimneys, valleys, skylights, vents, and other protrusions where leaks are likely to occur.
Ventilation ensures your home stays energy-efficient and free from excess moisture buildup, while flashing protects against water intrusion at critical points on your roof’s surface. Together, these elements form a comprehensive defense system that enhances both structural integrity and aesthetic appeal.
For handy homeowners replacing their roofs themselves, dedicating time to understand proper ventilation layout plans alongside meticulous attention toward applying appropriate flashings will elevate outcomes dramatically ensuring years worth peace-of-mind maintenance wise.

Recognizing these signs early can help prevent more extensive and costly repairs or damage to your property. Below are the key indicators that your roof may need immediate replacement.
Shingles are a critical component of most roofing systems, particularly asphalt-based ones.
– Cracked or curled shingles: These can indicate aging or exposure to extreme weather.Missing shingles: Gaps in your roofing system leave your home vulnerable to water damage.Granule loss: Excess granules in gutters or near downspouts may suggest that shingles are deteriorating.
Water intrusion is one of the clearest indications that something is wrong with your roof.
– Water stains on ceilings or walls: Often yellowish-brown in color, these stains suggest leaks originating from the roof.
– Mold or mildew growth: A result of prolonged moisture exposure, often caused by an ineffective barrier against rain or snow.Dripping water during storms: This signifies a serious issue requiring immediate attention.
If parts of your roof appear uneven or droop inward, it could indicate structural problems due to water retention, aging materials, or poor installation practices. A sagging roof needs urgent evaluation by a professional roofer.
Common culprits include damaged underlayment or ventilation issues caused by inadequate airflow through attic spaces.
| Sign | Possible Cause | Action Needed |
| Missing shingles | Wind damage, aging materials | Replace missing shingles |
| Water stains indoors | Leaks through damaged areas | Repair leaks; check underlayment |
| Sagging sections | Structural issues from water pooling | Full inspection; potential replacement |
| Mold/mildew presence | Inadequate moisture control | Address leaks immediately |
Roofs have a finite lifespan depending on their material type: – Asphalt shinglestypically last between 20–30 years.Metal roofingcan endure for up to 50 years with proper maintenance.Wood shake roofs, though attractive, often require replacement after about 20 years. If your roof has exceeded its expected lifespan, it’s time to consider a replacement before significant issues arise.
Delaying necessary repairs or replacements can lead to: 1. Escalated repair costs due to extended damage. 2. Compromised structural integrity affecting safety. 3. Reduced property value and curb appeal.
Recognizing these warning signs early ensures you address potential problems promptly while protecting both your home’s value and safety standards long term.
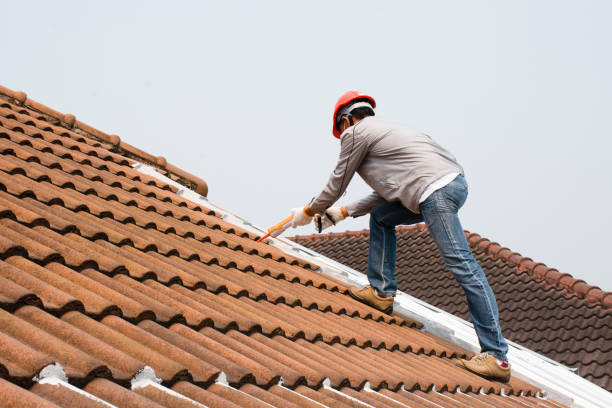
Choosing the right roofing material is one of the most important decisions homeowners and builders face when working on a roofing project. The durability of your roof not only impacts its longevity but also affects its ability to withstand weather conditions, prevent leaks, and maintain energy efficiency. Here is an overview of some of the most durable roofing materials available today.
| Type | Lifespan | Key Advantage |
| Steel | ~40 years | Cost-effective & strong |
| Aluminum | ~50 years | Rust-resistant & lightweight |
| Copper | ~70+ years | Premium aesthetic & long-lasting |
Opting for high-quality roofing materials provides several benefits: 1. Reduced frequency of repairs or replacements over time, resulting in long-term savings. 2. Increased property value due to enhanced curb appeal and reliability. 3. Better protection against weather-related damage such as hailstorms or heavy snowfall.
Even with the best materials available, certain factors can impact how long your roof lasts: 1. Proper installation – Ensuring professional workmanship during installation is critical for maximizing material performance. 2. Routine maintenance – Regular inspections help identify minor issues before they lead to significant damage. 3. Climate conditions – Some materials perform better in specific climates (e. g. , metal roofs excel in snowy regions due to their ability to shed snow).
Choosing the right roofing material involves weighing factors like budget, climate compatibility, aesthetic preferences, energy efficiency needs, and expected longevity. By investing in durable options now, homeowners can enjoy peace of mind knowing their roof will perform reliably for decades ahead without frequent repairs or costly replacements being necessary.
A roof installation or replacement is a significant investment that requires careful planning and execution. Understanding the process can help you prepare effectively, make informed decisions, and ensure the project runs smoothly. Below, we provide a detailed guide breaking down each step of the roof installation process.
Before starting any roof installation, thorough inspection and assessment are crucial.
This initial phase sets the foundation for a seamless project by addressing any underlying problems beforehand.
The next step is selecting the materials best suited for your home’s style, climate conditions, and budget.
| Roofing Material | Durability (Years) | Key Features |
| Asphalt Shingles | 20-30 | Cost-effective and versatile |
| Metal Roofing | 40-70 | Durable with modern aesthetics |
| Clay or Concrete Tiles | 50+ | Long-lasting but heavier |
| Slate | 50+ | Premium look with high durability |
When choosing materials, consider factors such as energy efficiency, maintenance needs, resistance to natural elements like wind or hail, and warranty coverage offered by manufacturers.
Before installing a new roof, removing the old one is essential in most cases.
Skipping this step can lead to poor adhesion of new roofing materials and potential structural issues over time.
Underlayment serves as an added layer of protection against moisture.
This layer ensures additional defense against weather elements that could compromise your roof’s longevity.
Attention to detail during this phase guarantees both functionality and curb appeal for your home.
The final walkthrough allows you to address any questions before signing off on completion paperwork with your contractor.
Understanding these steps provides homeowners clarity on what happens during roof installations while highlighting key decision points throughout the process. Choosing experienced professionals ensures quality workmanship while giving peace of mind about protecting one of your home’s most critical assets—the roof above you.
The roof installation process is one of the most critical aspects of maintaining a safe and functional home. Whether you’re replacing an old roof or installing a new one, understanding the steps involved can ensure the project runs smoothly and efficiently. Below is a comprehensive breakdown of the key stages in roof installation.
Before any work begins, preparation is essential to a successful roofing project.
– Inspection:A professional roofer will inspect your current roof (if applicable) to assess its condition and identify specific challenges, such as structural issues or water damage.
– Material Selection:Based on your budget and climate, you’ll choose roofing materials such as asphalt shingles, metal panels, or tiles. Each material offers different benefits in terms of durability, cost, and aesthetics.
– Budget Estimation:The contractor will provide you with a detailed estimate that includes labor costs, material expenses, and any additional fees for permits or cleanup.
If you’re replacing an existing roof, the next step involves removing old materials:
– Stripping Off Old Layers:The existing shingles or roofing materials are removed down to the decking. This ensures that there’s a solid base for the new installation.
– Debris Cleanup:All debris is carefully removed from your property to maintain safety and minimize disruption.
Once the old materials are stripped away, it’s time to examine the roof decking:
– Structural Integrity Check:The contractor will inspect for rotted or damaged decking that needs repair or replacement before proceeding. Damaged areas can compromise the lifespan of your new roof if left unaddressed.
– Moisture Barrier Application:A waterproof underlayment or moisture barrier may be installed over the decking to prevent leaks in vulnerable areas.
With a sound foundation prepared, contractors proceed with installing your chosen roofing material:
1.Laying Starter Strips:Starter strips are placed along edges to create a clean line and improve adherence for shingles or tiles.
2.Shingle/Tile Placement:Shingles or tiles are arranged systematically from bottom to top in overlapping patterns to ensure proper drainage and protection against water infiltration. 3.Sealing Flashing Areas:Flashing is installed around chimneys, vents, valleys, and other penetrations to prevent leaks in these areas. 4.Ridge Cap Installation:Ridge caps seal off ridges at the peak of your roof while providing additional ventilation if needed.
Once all roofing materials are installed:
– Quality Inspection:The contractor performs a thorough inspection of their work to confirm that everything meets quality standards.Site Cleanup:Any remaining debris is removed from your property.Warranty Documentation Provided:Most reputable roofing companies offer warranties on both materials and workmanship.
| Steps | Tasks Included | Purpose |
| Preparation | Inspection & Material Selection | Establishes scope & budget |
| Removal | Stripping Old Layers | Clears space for new installation |
| Decking Check | Repairs & Moisture Barrier Installation | Improves longevity & performance |
| Material Install | Laying Shingles/Tiles & Sealing Flashing | Ensures weather resistance |
| Final Touches | Quality Check & Cleanup | Guarantees satisfaction |
Understanding these steps will empower you as a homeowner to communicate effectively with contractors during your project while ensuring every detail receives proper attention throughout its execution process.
Proper planning and obtaining necessary permits are essential steps in ensuring a successful roof installation project. Homeowners often overlook these aspects, but neglecting them can lead to costly delays, legal issues, or subpar results. Below, we’ll break down the key components of planning and securing permits for your roofing project.
Every successful roofing project begins with detailed planning. This phase ensures that the timeline, budget, materials, and labor are all accounted for.
In most locations, roof replacement or installation projects require obtaining permits from local building authorities. Securing these permits is often mandatory for compliance with building codes and safety standards. Failing to acquire them can result in fines or even being required to redo the work.
Homeowners sometimes encounter obstacles during this process.
| Challenge | Solution |
| Unclear Permit Requirements | Consult professionals like contractors who are familiar with local rules. |
| Delays in Approval | Submit applications early to account for processing times by authorities. |
| Unlicensed Contractors | Always verify that contractors have valid licenses before hiring them. |
For complex projects or those unfamiliar with construction protocols, working with professional roofing contractors can streamline both planning and permitting processes. Experienced contractors often handle permit applications on behalf of homeowners while ensuring adherence to codes.
By prioritizing careful preparation and compliance with local regulations through proper permits, you set a solid foundation for a smooth roof replacement experience—protecting both your investment and peace of mind over time.